Help
Thesis Help
Margins
- We ask for margins of 3 cm on the inside (left) and 2 cm on all other sides. If your college requires larger margins, we recommend following their guidelines, and have no problem printing as per their requirements.
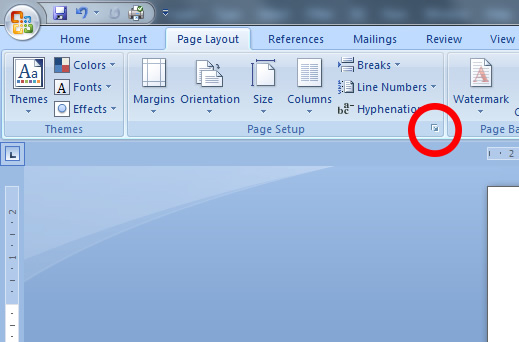
- In Microsoft Word, this can be set by selecting Page Layout at the top left of your screen. You should see a small arrow at the bottom right corner of the Page Setup box. This is highlighted in the first example. Click this arrow.
- Please see the next example for the standard margins that we recommend. It’s normal to leave the gutter margin as 0 cm. These margins will work perfectly for single sided printing. If you require double sided printing, please see the next tutorial.
- Just make sure that you’ve left a binding margin next to any tables, images, and, if possible, appendices.
Margins

Double Sided Margins
- To set up your margins for double sided printing, select Page Layout at the top left of your screen. You should see a small arrow at the bottom right corner of the Page Setup box. This is highlighted in the first example. Click this arrow.
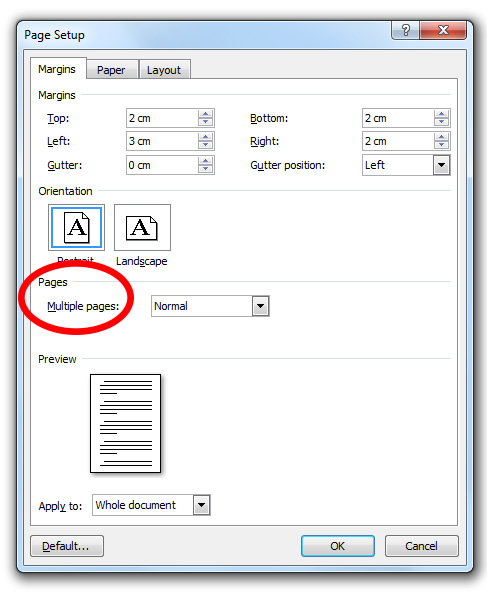
- About half way down the box that pops up, you should see Multiple pages: Normal. This is highlighted in the second example. Click the arrow to the right of Normal and select Mirror margins. You should see that Left and Right in the Margins section have changed to Inside and Outside.
- Please see the third example for how the box should look when mirror margins are enabled and the standard margins that we recommend (3 cm on the inside and 2 cm on the others). Just make sure that you’ve selected Whole document at the bottom of this box.
Double Sided Margins


Page Numbers
- To insert page numbers, select Insert from the top left of your screen.
- You should see Page Number in the Header & Footer section. Click this and then select Bottom of Page. Generally you would then select Plain Number 2, which would put the numbers in the centre, or Plain Number 3, which would put the numbers at the right / outside.
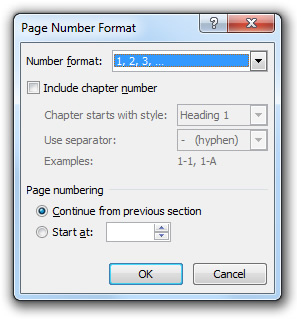
- To change the appearance of your page numbers, select Insert from the top left of your screen again. Click Page Number again and select Format Page Numbers. You should see the box in the third example. Number format allows you to change your numbers to roman numerals or letters. Page numbering allows you to start your numbering from something other than 1.
Page Numbers


Roman Numerals & Regular Numbers in 1 Document
- Start by inserting your page numbers using the above method. You should see that your numbers start at 1 on the first page of your document.
- Go to the page where you’d like your regular numbers to start and double click at the start of the page. Make sure that you can see the cursor flashing before the first word.
- Now we have to insert a section break between the two parts. To do this, click Page Layout at the top left. Next, click Breaks in the Page Setup box. Then click Continuous under Section Breaks. The first example will show you exactly where this is located. You shouldn’t see anything different about your document once you’ve done this.
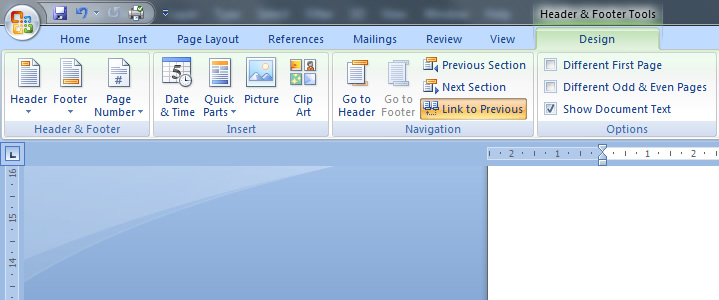
- Double click the page number on the first page where you’d like your regular numbers to appear. At the top of the screen, Design should be selected. If not, click on Design. In the Navigation box, Link to Previous should be highlighted. Click Link to Previous to unselect it. This part is shown in the second example.
- Next, click Insert at the top left. Then click Page Number and Format Page Numbers. A box should appear like in the third example. In the Page numbering section, Continue from previous section should be selected. Select Start at: instead and type 1 if it doesn’t appear automatically.
- Now double click the page number on any page where you’d like a roman numeral to appear. Click Insert at the top, then Page Number and then Format Page Numbers. In the box that appears, select the roman numerals from the first drop down menu, like in the example. You don’t need to change anything else in this box. Click OK and you should see that you now have two sets of page numbers in the document.
You can also use this method if you’d like to have no page numbers in a section. Follow the first five steps and then you can just remove the first set of page numbers by selecting them and pressing the Delete key.
Roman Numerals & Numbers

Saving as PDF
- Once you’re happy with your file, click File or the Microsoft Office button, depending on your version of Word. You’ll find these at the top left of your screen, as shown in the first example.
- Click Save As.
- Choose where you want to save your file and from the list of file types, select PDF. You can see this in the second example.
- Click Save and you’ll now have a PDF version of your file. Make sure to keep an up to date version of your Word file as well, as you’ll need this to make any changes.
Saving as PDF


General Tips
- Some Microsoft Word templates use blue headings, which can drive up your printing cost. To keep costs down, we recommend changing these to black text. We also recommend this for Internet links.
- Use page breaks to move on to the next page rather than pressing return. This will prevent your headings from moving around when you edit.
- Set up your margins as early as possible, to make it easier on you when you finish editing.
- If you’ve used the automatic Table of Contents, make sure you’ve updated it before you convert to PDF. This will show you if there are any errors in your headings.
- Check your figures/illustrations/tables and make sure their titles haven’t moved to another page.
- If you’ve used a Mac, it’s especially important to check the page numbers in your PDF before sending it off. Sometimes you’ll find that the bottom of your numbers will be cut off. If you encounter this problem, see this page for instructions on to fix it.
- Don’t forget to rest and eat regularly. It’s a marathon, not a sprint!
Looking for some extra help?
Based in Dublin, Ireland, but accessible online to anyone across Ireland, CareerProjections is led by Dr. William Mallon and his small online team of professional proofreaders. They are academic doctors who provide expert support for students, and writers.
CareerProjections have the most competitive prices in the Irish market for proofreading and editing and come highly recommended by both ourselves and by colleges across the country.
Why choose CareerProjections?
- Higher Grades: A properly proofread and formatted thesis can be the difference between a pass and a fail, or in our examples, a 1.1 or a 2.1.
- Fast Turnaround Time: A good proofreader will save you 2-3 weeks, on average. That is time you can spend tightening up your thesis argument and making sure you have all the necessary components. It is far easier to write and think coherently when you don’t have to worry about the ‘little things’ such as spelling, grammar, and formatting.
- Lowest Prices in Ireland: We are half the price of our competitors, and sometimes, three and four times lower. There is no archaic cost per 1000 word / cost per page calculator here. All our work is done online, which saves us in costs. That translates to savings for you.
- Customer Service: Our reviews speak for themselves. We are there for you. We never judge. Our goal is to guide and instruct. Constructive, NOT destructive, criticism!
CareerProjections